

Resume where you left off
On the Mac, press ⌘1 to switch to Play. The Continue Watching row holds everything you're partway through: pick one with the arrow keys and press Return. To get back to your files, press ⌘2 for the Workbench. Play on a title page also starts from where you stopped, and older viewings are under History in the sidebar.
On iPhone and iPad, the History row on Home shows what you've been watching; tap one to carry on. Tap the row's heading to see everything, with Resume playback and Play from beginning right there.
On the Mac, Settings → Playback decides when something counts as watched and what happens next:
- When a Video Counts as Completed: past this point the resume point clears and the video counts as watched. If films drop out of Continue Watching before the credits end, or linger after you've finished them, adjust this.
- Autoplay Next Item: a show goes on to the next episode; movies and personal videos follow the order of the current list. An 8-second countdown comes first.
Subtitles and audio
Along the bottom of the Mac player: volume on the left, play/pause and skipping in the middle, and subtitles, audio, speed, more and full screen on the right. Click subtitles or audio and the side panel opens. It has seven pages, Episodes, Subtitles, Audio, Picture, Playback Options, Output and Info, and ⌥⌘1 through ⌥⌘7 jump straight to each one. (Episodes appears only when there's a next episode or a playlist.)
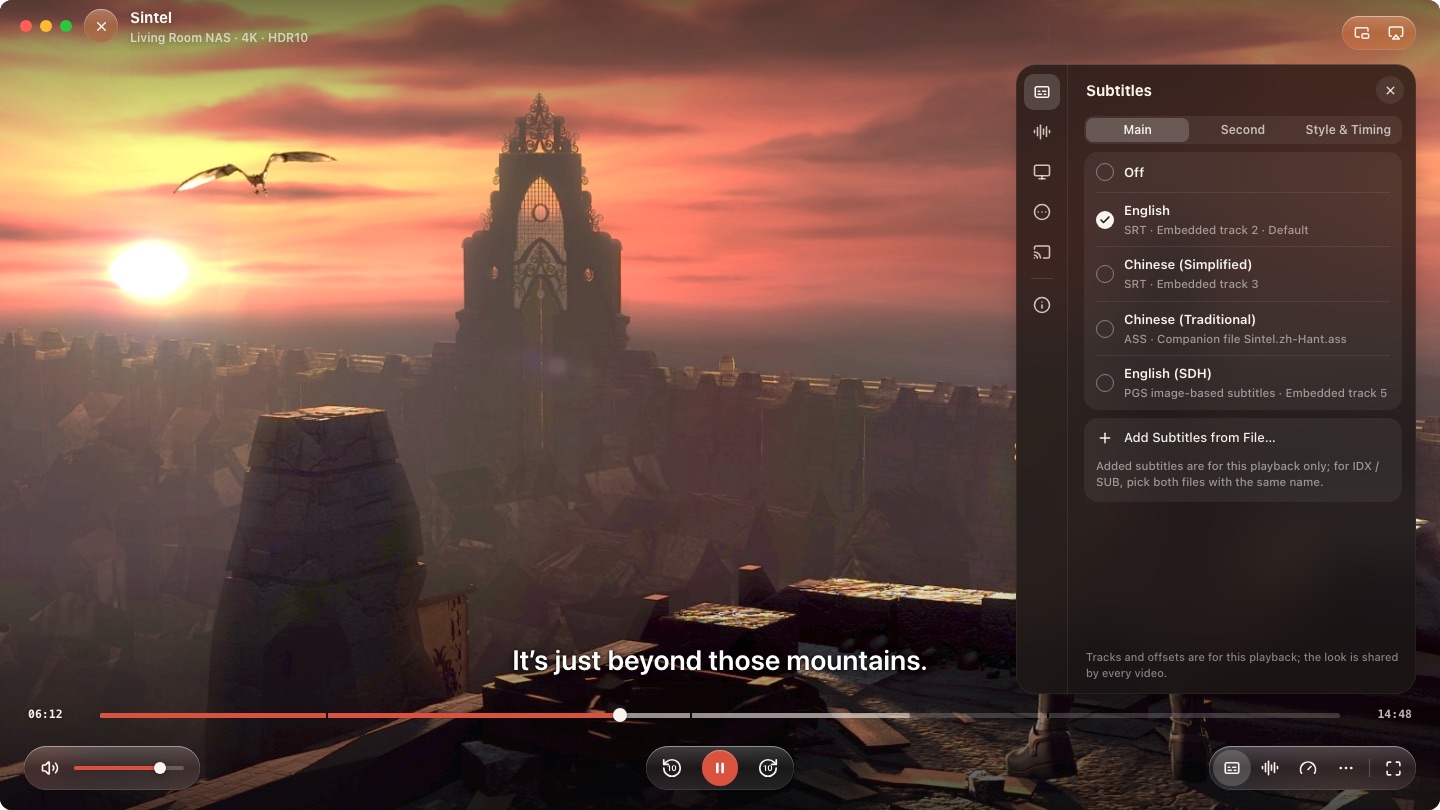
- Main: embedded subtitle tracks and matching subtitle files next to the video, all in one list. Click one to switch.
- Second: add a second track, shown at the top of the picture. Handy for comparing two languages.
- Style & Timing: if subtitles run early or late, press ⌥[ to bring them forward or ⌥] to delay them, 0.1 seconds at a time.
- Add Subtitles from File…: pick an SRT, ASS, SSA or VTT file on your Mac, or an IDX + SUB pair. Added subtitles are for this playback only.
To get it right every time, set Subtitle Language Priority and Audio Track Priority in Settings → Playback, and turn on Remember My Subtitle Choice, Remember My Audio Choice or Load Sidecar Subtitles if you like. Font, color and position live in Subtitle Appearance and apply to every film.
On iPhone and iPad, switch tracks with the subtitle and audio buttons while a film plays; default languages and the look of subtitles are under Manage → Subtitles and Manage → Sound.
When the picture looks off
Black bars above and below a film usually aren't a fault; plenty of films are simply wider than your screen. Watch in the original shape first. If you really want to fill the screen, change Aspect on the side panel's Picture page and watch for stretched faces or cropped edges. The same page adjusts brightness, contrast and saturation.
For HDR10, HDR10+, Dolby Vision and HDR Vivid, Nsuve tone-maps to what your display can show, so the same film can look different on different screens.
On iPhone and iPad, picture settings are under Manage → Video.
What plays
Nsuve has its own playback engine, so nearly everything you're likely to have plays as it is, with no converting and no extra player:
| Type | Supported |
|---|---|
| Containers | 30-plus, including MKV, MP4, MOV, AVI, RMVB, WMV, FLV, TS / M2TS and VOB |
| Video | H.264, HEVC (10-bit too), AV1 and VP9, through to RV30 / RV40, VC-1 and Theora |
| Audio | AAC, AC-3 / E-AC-3, TrueHD and DTS-HD, through to FLAC, ALAC, APE and DSD |
| Subtitles | 13 formats, including SRT, ASS / SSA (with effects), PGS, WebVTT and TTML; embedded or external, and external files that aren't UTF-8 display correctly |
| HDR | HDR10, HDR10+, Dolby Vision, HDR Vivid |
| Discs | Unencrypted Blu-ray folders (BDMV), ISO images and DVD VIDEO_TS folders, with titles, chapters and menus |
Hardware decoding: HEVC, AV1 and 4K use Apple's hardware decoder (VideoToolbox). 8-bit H.264 at 1080p and below goes to multithreaded software decoding on purpose. AV1 hardware decoding needs a chip that has it, which on Apple devices means M3 or A17 Pro and later.
Films on the network play as they download. On a slow connection the player shows how much is buffered, and after a stall it waits until it has enough to carry on. On the Mac, Settings → Playback also has Cache While Watching and Buffer the Next Episode Early.
On the TV: the Mac can send to AirPlay, Chromecast, DLNA and Roku devices from the side panel's Output page; formats the receiver can't play are converted to HLS on the fly. iPhone and iPad use AirPlay.
When playback stutters: Playback Diagnostics
On the Mac, with the player window in front, press ⌥⌘I to open Playback Diagnostics. The top line says whether playback is healthy. Below it are the last 60 seconds of speed, bitrate and buffer ahead, the Decoding route (hardware or software this time) and how many times it rebuffered. If something's wrong, Things to try suggests what to do.
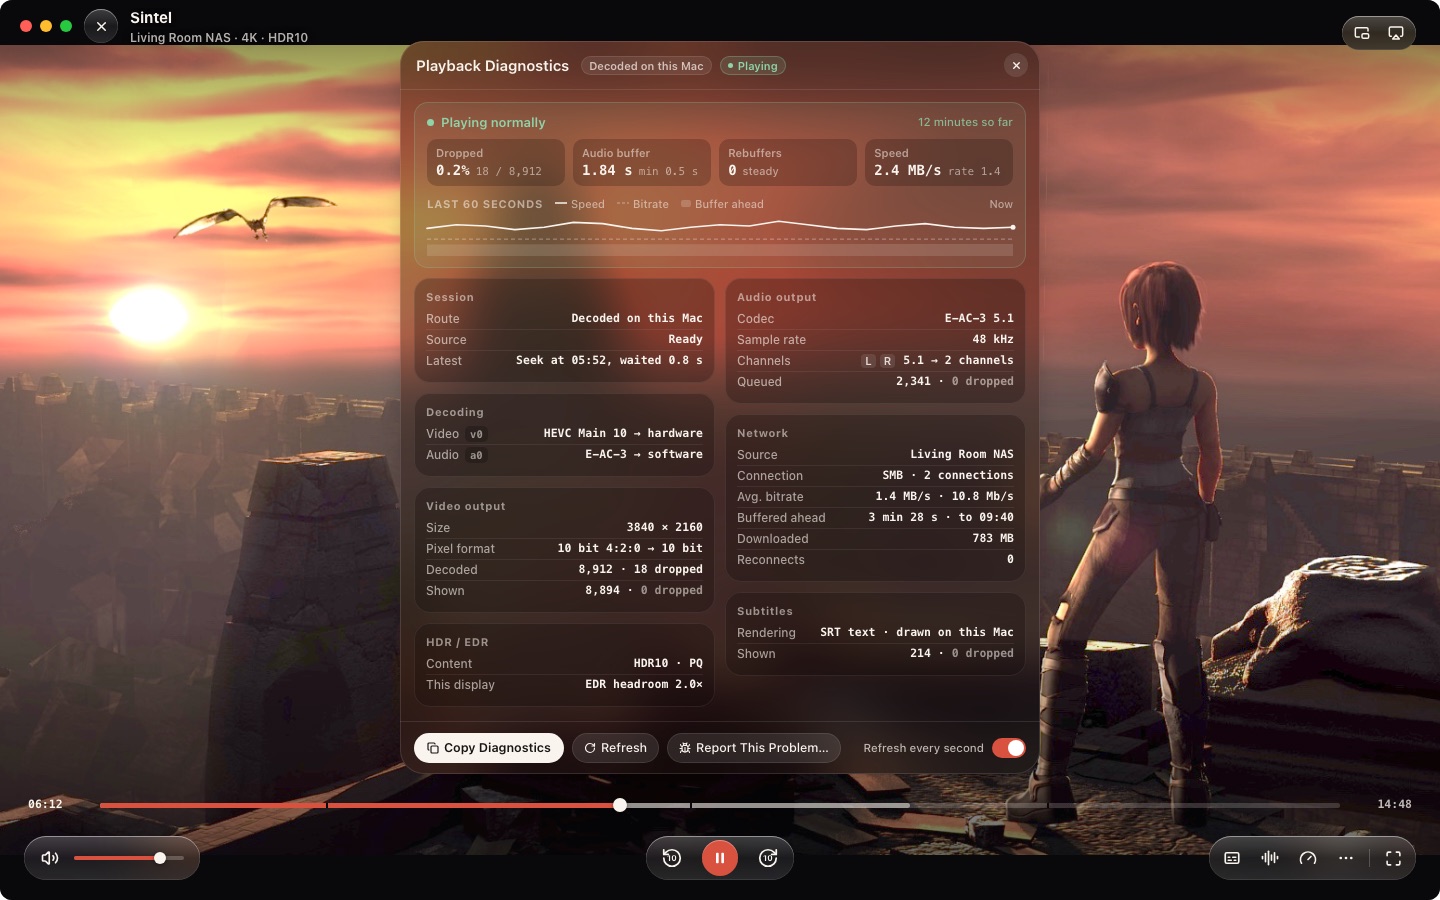
- Copy Diagnostics: copies the details without file paths or accounts, ready to paste anywhere.
- Report This Problem…: sends the diagnostics straight to the developer. A report may include titles and paths from your Private Space; they're used only to fix the problem and are never made public.
A 1080p H.264 film showing software decoding is by design, not a fault. For a file that just won't open, you can set a Fallback External Player in Settings → Playback.
Read next
- WatchingOne library. Six screens.What the Mac, iPhone, iPad and iPhone Duo each do, how Nsuve Link plays your Mac's films on a phone, and how one Pro purchase covers your devices.
- OrganizingOne theme, one listGroup films by hand, let a tag build a smart collection for you, and keep what's private in Private Space.