

Connected, not copied
When you connect a source, Nsuve reads its folders, recognizes the films and shows, and keeps an index on this device. Nothing is moved and nothing has to be downloaded first: open a film and it streams from the source as it plays.
Everything you connect adds up to one library. A film that sits on both your NAS and a media server still counts once. On the Mac, the source menu at the top of List switches between All Sources, this Mac and each NAS when you want to see just one.
On iPhone and iPad, your NAS library (matches, the fixes you made, the versions you picked, each NAS's settings and how far you got) can sync between your devices through your own iCloud. NAS addresses and passwords don't sync.
Add a source
On the Mac:
- In the Workbench sidebar, open All Sources under Media Sources and click Add Location. You can also right-click Media Sources in the sidebar and choose Add Source….
- In Add Media Source, pick a type: This Mac, NAS & Servers, Media Servers or Cloud Drives.
- Fill in the form. Only the host is required and the port has a default; leave the username and password empty to sign in as a guest. For SMB, Nsuve lists the shared folders so you can pick one.
- Click Test Connection, then Save.
On iPhone and iPad:
- Tap + and choose Add a Source, or tap Add a Source on the Sources page.
- Found on This Network comes first: NAS boxes and media servers on the same network show up by themselves, address included. Or pick a type under NAS & Servers, Media Server or Your Devices.
- Fill it in and save.
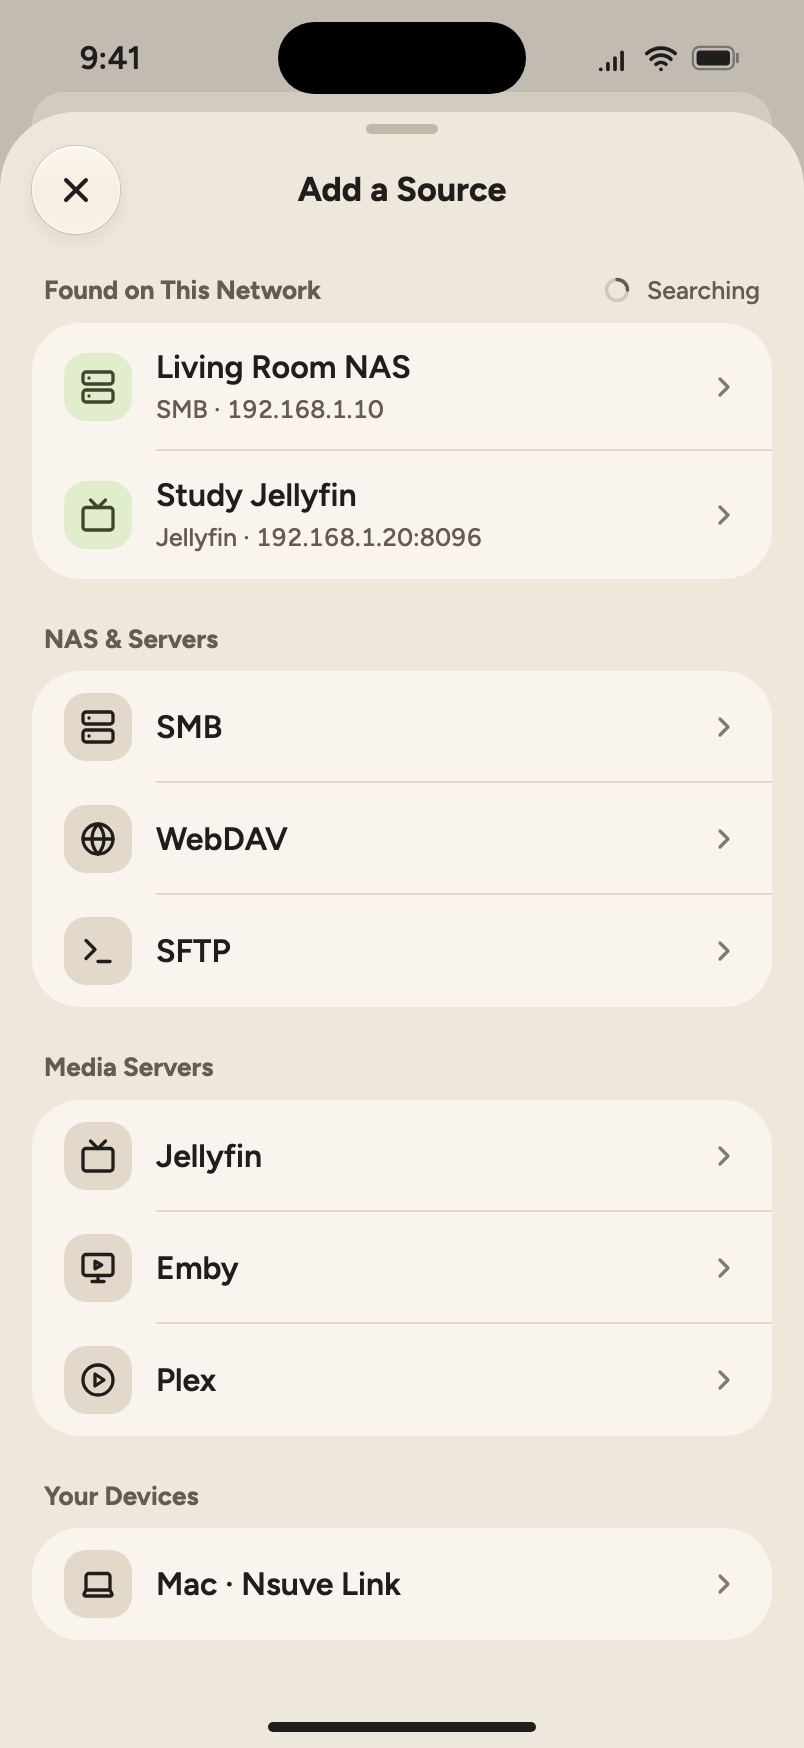
The Mac and iPhone don't connect exactly the same things:
| Source | Mac | iPhone and iPad |
|---|---|---|
| SMB, WebDAV, SFTP | Yes | Yes |
| Synology, QNAP, fnOS | Own entries | Connect the same NAS over SMB or WebDAV |
| Mounted shares (SMB / NFS), DLNA / UPnP, Nextcloud | Yes | — |
| Emby, Jellyfin, Plex | Yes | Yes |
| External drives, local folders | Yes | Files on the device and locations in the Files app |
| Cloud drives | Yes (see below) | — |
| A Mac (Nsuve Link) | — | Yes |
A few details. Plex lets you sign in and pick a server, or type the server address yourself. SFTP can sign in with a private key. Media servers accept custom request headers, and on iPhone and iPad a media server can keep several addresses and use whichever one answers. FTP is no longer offered when adding a source, but FTP sources you added before keep working.
To watch your Mac's library on iPhone or iPad, choose Mac · Nsuve Link under Your Devices. On the Mac, open Nsuve Link in the sidebar, scan the QR code with your phone, check that the 4 digits match, then click Allow on the Mac. Nsuve Link stays on your local network and never goes through the cloud.
Media servers get a page of their own
Connect Emby, Jellyfin or Plex and Nsuve builds a page for it that looks like the Apple TV app's home screen: a featured row at the top, then Continue Watching, each of the server's libraries, and genres.
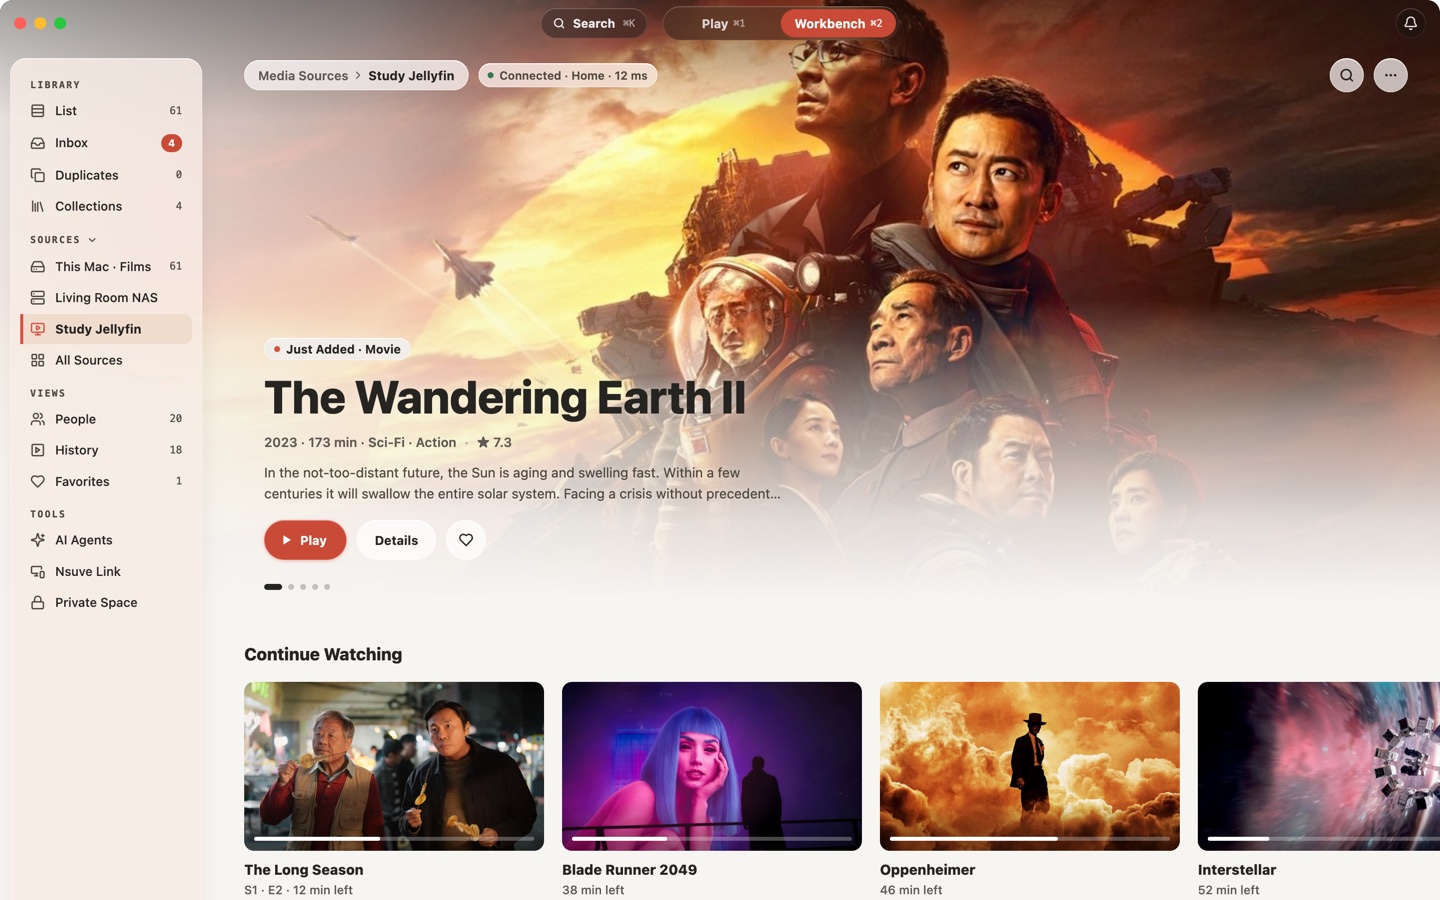
Open a library and you get that server's poster wall. Nsuve uses the server's own posters, overviews and title logos, and each cast member opens to a page with their photo, credits and bio. When you search with ⌘K on the Mac, each media source gets its own section in the results.
iPhone and iPad have the same page.
Cloud drives: Mac only
The Mac connects directly to Baidu Netdisk, 123 Cloud, OneDrive, Google Drive, Dropbox, MEGA and pCloud, as well as Nextcloud, MagentaCLOUD, HiDrive, Koofr, Icedrive and kDrive. As with any other source, Nsuve only reads the folders and builds an index; films stream when you open them.
Dropbox, OneDrive, Google Drive and pCloud are authorized through each service's own sign-in, and MEGA through its official SDK; those tokens never pass through Nsurator's servers. Baidu Netdisk is the exception: its authorization goes through a small Nsurator relay that keeps the encrypted result for at most 24 hours.
For folders a sync client already keeps on your Mac, such as iCloud Drive or anything under ~/Library/CloudStorage, choose Synced Folder and add them like any local folder.
When a source is offline
Your library's info lives on this device, so you can still browse and search while a source is unreachable. To play, the source has to be back.
- An unplugged external drive shows as Not connected, and its info stays.
- A NAS that can't be reached is marked as offline in the source menu at the top of List.
- A media server that can't be reached keeps the page it last loaded, dimmed.
- On the Mac, Check All on the All Sources page checks every source in one go.
On a slow connection the player shows how much is buffered, and after a stall it waits until it has enough before carrying on; a slow connection is swapped for a faster one. More in Pick up where you left off.
Read next
- WatchingPick up where you left offResume where you left off in Nsuve, set autoplay and when a video counts as watched, pick subtitles and audio, adjust the picture, see which formats play and which use hardware decoding, and open Playback Diagnostics with ⌥⌘I.
- WatchingOne library. Six screens.What the Mac, iPhone, iPad and iPhone Duo each do, how Nsuve Link plays your Mac's films on a phone, and how one Pro purchase covers your devices.